Real quick... I just noticed that Mood gave me a coupon code to share after I checked out! I don't know if they've always done this (and I wasn't paying attention) or if it's a new thing. Here it is just in case anyone wants it: REWARD-3799-102CJ-MIWS

March 14, 2017

January 25, 2016
TNT: Kimono Tshirt
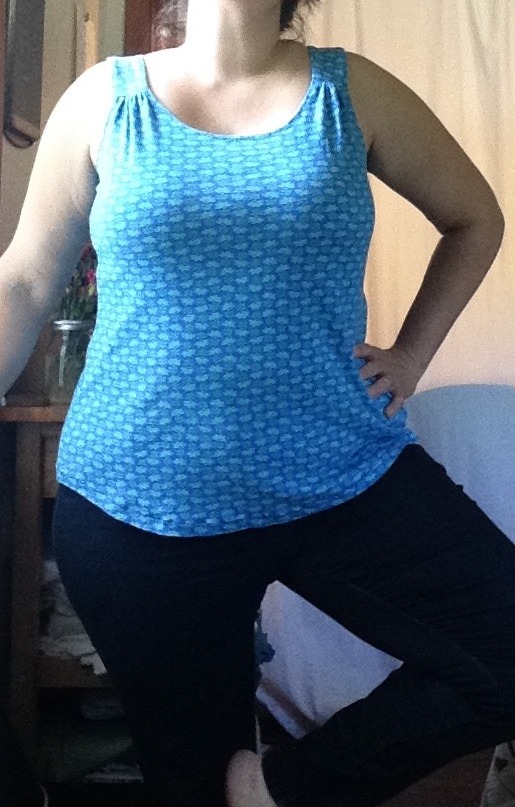
 This is my latest version of the Maria Denmark Kimono Tee, which has become a tried and true for me, although I'm not sure I should still call it by its original name. At what point does a pattern go from original to "just a kimono tee I make"? Because seriously, the number of changes I made to this pattern to get here is just insane and it doesn't really resemble to original except that it has cut on sleeves. I changed the height and shape of the neckline, narrowed the shoulders, lengthened the sleeves, changed the shape of the side seams, added a back seam for a sway back adjustment and big bum adjustment, changed and lengthened the shape of the hem, and did a rounded back adjustment. I think that covers it. So yeah, maybe I should just say "this is my tnt kimono tee".
 | ||
| Center back seam... no pattern matching. |
Anyhow. Latest version - nicely textured blue and white abstract rayon jersey from Mood. (has an almost linen like texture... not slippery).


January 9, 2016
Links and Mending
- Cutting flat vs cutting on the fold (via Grainline)
- I really like Budget Bytes. Not complicated but very appealing recipes made with real food. Many meals in my Plan To Eat meal planner are from this blog these days. (I loooove plan to
eat as well)
Mending the wool jammie pants with colorful wool thread

- Tonight's dinner from Budget Bytes.
- This mending is so inspiring. Now that I have jettisoned all the rtw that isn't quality what's left is getting mended.
- I seriously love this. (Free Tea Party)
- Dry shampoo, where have you been all my life? This one is working well and doesn't have artificial fragrances or weird chemicals in it.
- Someone needs to make me Feta Tapenade Tart Soleil
August 5, 2015
Fabric!
 |
| the beloved fabric |
THEY HAVE MORE!!!
I am excited.
I also ordered the Italian black stretch striped wool on sale today, black wool challis, a thin green wool jersey, and some brown silk habotai to line a top I'm going to make with that brown dotted silk I bought a while back.
I heart wool, yall.
So excited!
I hacked a Sorbetto into something that I'm pretty sure works for me so between that and the Aurora and the Kimono Tee I'm feeling successful with fitting these days (although, would you believe I forgot to add back length AGAIN when I did my most recent sway back adjustment? WTF? I apparently have a giant blind spot when it comes to back length). Still working mostly on making tops because that's the big gap in my wardrobe at the moment. My RTW bottoms are not awesome but they're ok for now.
Small went with us to the fabric store to pick out some fabric for pajamas. We ended up with 2 flannel and 2 quilting cottons. He did not pick out the train flannel, much to our surprise, but then proceeded to tell EVERYONE that mommy was making him train pajamas. Sigh.
I also got some fun rainbow abstract flower quilting cotton he rejected just because I love it and some gorgeous yellow dandelion and butterfly fabric that I was intending to use for my niece. Henry studied those fabrics on my shelf and said "Mommy, is that fabric for Emmie?" and I said yes and then he said "but I love butterflies and flowers too. I think you should make me something out of that fabric and use something else for Emmie".
Preschoolers be crazy.
I still have plans to order some washer linen and some art gallery knits from fabric.com and more rayon challis and double gauze from Imagine Gnats (particularly this nani IRO and this one by Kokka) but I'll put that off a little longer since I have a lot to sew right now.
July 27, 2015
Kimono Tee
 I did another muslin out of a brown cotton-poly for the kimono tee. Deciding it was good enough (except for lengthening the sleeves again and curving the hem) I moved onto the fashion fabric and completely forgot to take into account how much less stretchy it is than the muslin. It turned out slightly tight in the hips (not uncomfortable, just didn't look the best). Fortunately I fixed that with some side vents. Otherwise I really like the way this turned out! The fabric is much nicer so I think the whole thing hangs better. For some reason my curved hems are turning out not so curved when on my body. I suppose my own curves straighten out the hem curve so I'll just need to draft it more dramatically next time. Also, I matched those stripes like a boss! So proud of myself (first time sewing with stripes). Going to move on to wovens for a while then the next tee is going to be Hey June's raglan or Union St. I hear great things about those patterns and I think the cut on sleeve is just not as flattering on me as set in or raglan. Also there is some kiddo sewing coming up (finally! deadlines are arriving so I've got to get it together). My plan right now for my own clothing is to turn that black double gauze from

Imagine Gnats into Made By Rae's Washi blouse (sleeveless version) and the purple rayon challis in to True Bias's Sutton blouse (if I can squeeze it out of my short yardage. A woven tank if not).


The Wearable Aurora Muslins
This is one of my (kind of) wearable Aurora muslins. The first is from an adorable fabric with no recovery. Why do they even sell these fabrics? Sigh.
This one is sewn straight from the pattern. I just graded between three different sizes for the bust, waist, and hips. I ended up taking out a LOT of width in the hem. Then after I wore it I took out even more and when I re-hemmed it that time the sewing machine revolted and ate the fabric 3 times (!)
once with tragic results so I'll have a small darn in the back. It is tight at the armholes, the shoulder straps are too wide set, and it's out of a fabric that doesn't wear well so it's going to be a pajama top.


 For the second version (picture coming soon) I scooped out some of the armhole at the bottom and the front (too binding in the first version) and moved the straps in so they're closer to my neck. I think I could go even closer to get them exactly where I like them. Also, it needs a sway back adjustment but it's good enough that I cut it out in a few inexpensive pieces of jersey I had. Obviously I need more upper back width but I didn't notice until I took a picture of the rear. Doh! I will do a third version with closer straps and a sway back and see if I can get it perfect but after sewing it so many times (there was a totally failed muslin in between 1 and 2) I'm kind of bored and want to move on. The second one is from the cotton-poly heart knit I got last month. It's ok fabric but not great. Cute but a doesn't breath that well and it's recovery is not bad but not great.
Next on the sewing machine is Maria Denmark's free t shirt with cut on sleeves (or kimono sleeves as they say these days). The first version was totally wrong for me so I changed the shape and size of the neckline, lengthened the sleeves slightly and did a sway back adjustment (and I think I took in the side seams at the bust and sleeves because it didn't have negative ease like it was supposed to). The neck was way too small after that but I was able to cut it down and make what I thought was a wearable muslin. However, I forgot to add back the length when I did the sway back adjustment so it was way short in the back. In order to make it an actual wearable muslin I decided to put a slit in the back so the shortness serves a purpose and with one thing and another that did not work out. The neckband is wonky (partly because I just got sloppy with my work and partly because I'm bad at v-necks but they're my favorite to wear so I keep trying). Also I need to lengthen the sleeves on the next version because I like the length before they are hemmed. And then there is my machine which hates all stretch stitches. I can not make them work for love nor money. Especially the twin needle hem. I've tried adjusting everything in all combos but I can't get the bobbin thread to do the zigzag that makes it a stretchy stitch. Can I just get a cover stitch machine?! The most reliable thing to do is just sew a zigzag but I don't like the way that looks. Once I do another muslin for this shirt I'm going to sew it in final fabric and then move on...
...to Holyburn in this crazy crane fabric (quilting cotton) I've had for years. I never mind taping together digital patterns but this is such a large one it's making me rethink that. It's taking forever!
July 26, 2015
There was a sale...
... at Imagine Gnats. A really good sale. And there was some purple rayon challis. In spite of my aversion to synthetics I decided to give rayon challis a try because I keep reading, from all the sewing bloggers I follow, that it is awesome. They say it has great drape, sews well, and breaths well. I'm
skeptical about the breathing (these bloggers are not in coastal Texas in the summer) but Imagine Gnats had an offer I couldn't refuse so I bought out the last 1.5 yards of purple (it was the last but now the website says there is more) and I'm going to give it a try. It's not a super expensive experiment and it might end up adding to my options and that is a plus. If I love it then I am immediately buying this rayon challis from Indie Sew. I am in love with that print!
Anyhow, I also got some black double gauze. I've been wanting to try double gauze for a while. Some pin dot indigo chambray for a pair of shorts (and I am equally in love with the wrong side of this fabric!) and charcoal jersey with thin gold stripes (for a t-shirt).
So, I keep not blogging my makes because I can't
seem to find toddler free time to take pictures and also I take bad
photographs. Not because I'm not beautiful :-) but because I freeze up
in what my husband calls "the rictus" (defined as a fixed grimace or grin, so very apt) and somehow I turn out looking like a chipmunk every time. This is not what I see in the mirror. I've been thinking about ways to eliminate my face from the equation since that is where the problem is. I considered masks, which could be fun, or a large floppy hat rakishly tilted with giant sunglasses. I'll probably just crop the photo. There are a few good pictures of me out there but they tend to be un-posed with my son (so maybe I should have the toddler with me in pictures?).
And, I'm considering ditching blogger and going with something else. Not imminent but watch this space.
 |
| purple rayon challis and black double gauze |
Anyhow, I also got some black double gauze. I've been wanting to try double gauze for a while. Some pin dot indigo chambray for a pair of shorts (and I am equally in love with the wrong side of this fabric!) and charcoal jersey with thin gold stripes (for a t-shirt).
 |
| pin dot indigo chambray |
 |
| the "wrong side" |
And, I'm considering ditching blogger and going with something else. Not imminent but watch this space.
June 27, 2015
Fermented Pickles
A little more detail about those pickles in Monday's post...

I prefer fermented pickles to vinegar pickles any day of the week. This summer I have a really great batch going. It's pretty simple to do. I learned from Sandor Katz, both in person and from his book Wild Fermentation (I really recommend it). I make my pickles in a half gallon mason jar with a jam jar inserted in the top to hold down the vegetables. You can also buy various kinds of ceramic pickle weights but for my set up the mason jars work great.
I start with a salt water brine (use filtered water if you can), freshly picked cucumbers (blossom ends trimmed off) and green beans from the garden, garlic from the store, and a few grape leaves from the wild vines out back (helps keep things crisp). I clean all that, put it in the crock with the brine, cover it and let it sit on the kitchen counter for a few days. It usually takes about 4 days to get going at which point I put it in the fridge to slow down fermentation. Now that my brine is filled with microorganisms a fresh batch of cucumbers only takes a day and a half to 2 days (my kitchen is at about 80 degrees) to ferment before I put it away. Soooo good. I make sauerkraut, kimchi, and pickled carrots in the fall the same way.
Read Sandor's book and give fermentation a try. I bet you'll be addicted too.

I prefer fermented pickles to vinegar pickles any day of the week. This summer I have a really great batch going. It's pretty simple to do. I learned from Sandor Katz, both in person and from his book Wild Fermentation (I really recommend it). I make my pickles in a half gallon mason jar with a jam jar inserted in the top to hold down the vegetables. You can also buy various kinds of ceramic pickle weights but for my set up the mason jars work great.
I start with a salt water brine (use filtered water if you can), freshly picked cucumbers (blossom ends trimmed off) and green beans from the garden, garlic from the store, and a few grape leaves from the wild vines out back (helps keep things crisp). I clean all that, put it in the crock with the brine, cover it and let it sit on the kitchen counter for a few days. It usually takes about 4 days to get going at which point I put it in the fridge to slow down fermentation. Now that my brine is filled with microorganisms a fresh batch of cucumbers only takes a day and a half to 2 days (my kitchen is at about 80 degrees) to ferment before I put it away. Soooo good. I make sauerkraut, kimchi, and pickled carrots in the fall the same way.
Read Sandor's book and give fermentation a try. I bet you'll be addicted too.
June 26, 2015
Links

- An oldie but a goodie: Natural does not equal safe on Sorta Crunchy
- I've always thought that this "meat is the worst thing for global warming" idea is bunk. The Radical Homemaker breaks it down really well.
- Yarn video games. YARN VIDEO GAMES!!
- Food In Jars shared a strawberry chutney which sounds great.
- Caramelized Sesame Chocolate Bar from Chocolate and Zucchini
- I want to buy ALL of Art Gallery's knit fabrics and make a thousand Auroras.
- I started reading a few historical sewing blogs and even though it's not something I'm going to sew, I love their enthusiasm! And it is interesting. American Duchess is one of them.
- Lining, underlining, interfacing, facing... so much to learn!
- You know those gorgeous blown glass beverage dispensers? I've always wanted one (not that I have room to store it or a reason to use it, but maybe one day) but they always have these cheap plastic spigots which turns me off. However stainless steel spigots are available to replace them!
- All the details of making mustard from Hunter Angler Gardener Cook
June 25, 2015
The New Sewing Space
I lost my sewing room and instead I have a nook. It's one of the closets in our bedroom. The original plan was to move my sewing space into the living room, and there was plenty of room for that, but then I realized that being able to shut the door and be by myself and work on a project, even while other people are in the house, is ESSENTIAL to my mental health. Especially during the weeks when, for various reasons, I don't get my usual alone time breaks where everyone is gone, I need to be able to take an hour here or there to pretend I'm alone :-)
We're still going to make a hinged, drop down, counter height cutting table that lives on the wall of the living room so I can take advantage of toddler free time to do some garment cutting out. I'm still using the same work table as before so I can technically still cut things out but anything longer than these tanks I've been working on went from difficult to nearly impossible in this new cramped space.
Still, I'm liking it just fine and I'm loving our new, toddler free room! And the living room has turned back into a comfortable, uncrowded family space, which is nice (all the toys are now in his room). And all that moving around of furniture and stuff means that we finally got around to consolidating our things after many years of slowly clearing out. Suddenly we have a lot more space in the house because things are compactly and sensibly organized.
In other news, Small apparently grew a lot in the last week because suddenly none of his shorts fit! I had a stash of the next size up from a few swaps on Swap Mamas so we were able to get some out of there. However they're all super long. We've always known Small was built along the lines of a refrigerator. Not chubby any more... as I type this I'm looking at him reading on the couch and I can see all his ribs. But he is a barrel shaped dude. So now I have a bunch of shorts to hem and sewing shorts for him just moved to the top of the sewing queue!
Here are some pics of my new sewing nook:
There is a lot in there but it works. I'm still loving my rolling sewing cart. It lives to the right and I can slide it out when necessary either to get to stuff on the lower shelves or to find a paper pattern which live rolled up in a trash can in the corner. The light is just a paper light lamp kit slipped through an antique ceiling fan light shade and then wrapped around the curtain rod.
 There is a large shelf up top which holds boxes of various things, not necessarily sewing related, and a narrow shelf under that for all the tins and cups of supplies. Here are my tins and bucket of buttons, my tape (I use mostly digital patterns) and my stapler (which I also use all the time with digital patterns). Below is a picture of more of the narrow shelf with colored pencils, sharpening stones, thumb tacks and the buttons I use for thumb tacks, various pallet knives, brushes, etc. and then some of my mom's old drafting tools from architecture school.

 All my various rulers live on a nail in the door frame. Also some odds and ends on hooks. To the left is a giant roll of cotton-hemp plain weave cloth I use in my etsy shop. Hanging from the curtain rod (curtains instead of doors on these closets) are the Swedish tracing paper patterns clipped together with the clip type curtain rings and then hung there.
 On the clothes rod to the right, over my rolling cart, is my queue. I have the prepped fabric draped over hangers. The pattern or instructions are clipped with a binder clip which has a string loop through the handles. That hangs off the hook end of the hanger. If I get my act more together in the future, I'll attach all the necessary notions as well. At the moment I'm just searching for and/or buying notions as each project arrives at the top of my list.
We're still going to make a hinged, drop down, counter height cutting table that lives on the wall of the living room so I can take advantage of toddler free time to do some garment cutting out. I'm still using the same work table as before so I can technically still cut things out but anything longer than these tanks I've been working on went from difficult to nearly impossible in this new cramped space.
Still, I'm liking it just fine and I'm loving our new, toddler free room! And the living room has turned back into a comfortable, uncrowded family space, which is nice (all the toys are now in his room). And all that moving around of furniture and stuff means that we finally got around to consolidating our things after many years of slowly clearing out. Suddenly we have a lot more space in the house because things are compactly and sensibly organized.
In other news, Small apparently grew a lot in the last week because suddenly none of his shorts fit! I had a stash of the next size up from a few swaps on Swap Mamas so we were able to get some out of there. However they're all super long. We've always known Small was built along the lines of a refrigerator. Not chubby any more... as I type this I'm looking at him reading on the couch and I can see all his ribs. But he is a barrel shaped dude. So now I have a bunch of shorts to hem and sewing shorts for him just moved to the top of the sewing queue!
Here are some pics of my new sewing nook:
 |


June 24, 2015
New Fabrics
There was a sale on knits and since I just made a successful wearable muslin for Aurora (Seamwork Magazine issue no. 7) and also a less than wearable muslin for Maria Denmark's kimono tee I needed some inexpensive knits to muslin up some more stuff. Of course I also ordered some 1 yard chunks for more Auroras... I love this pattern!

 I got a rayon silk jersey because I wanted to try it out. It's rather thin and slinky but it does feel lovely. I'm not sure that it will work as a t-shirt (on me) but maybe something drapey like a loose cardigan. I also got some cotton-poly open sweater knit. Not sure what I'll do with that either. Probably a cardi but maybe some kind of double layered skirt? For real warmth and layering I always wear wool cardis. They are cooler in warm weather and warmer in the cold (than cotton of the same weight) so they're great at transitioning between indoor and outdoor temperatures or as the temperature goes up during the day. However for those times when I need something to just basically cover my shoulders and upper arms (when a tank might not be appropriate or I want to dress something up) then I use the thin lacy sweater knits, etc.

One yard of a red striped pattern on dark blue. Not a pattern I'm usually into but it was way on sale and I'm willing to try new things.

A darkish green spandex cotton knit for a t-shirt. It's more army green than I wanted but it's ok.

White hearts on dark blue for a second Aurora. At this point I have 10 tanks or so, 2 of which are me-made and all but one of them are black or dark blue. I really have to switch it up. Of course now that I've found Aurora I'm going to make a million and ditch the ill fitting RTW tanks so new colors should be coming.

And heathered brown cotton blend jersey. It's not as soft as the heathered teal cotton blend I got last month but it's not too bad. It's mostly for muslins anyhow although if one turns out wearable this is certainly a color I would wear.

I have this problem that, because I'm always reading about sewing, I am constantly getting new ideas and getting excited about new fabrics. I originally wrote linen off because it has a tendency to grow. That would be problematic for pants or a fitted dress but for a loose summer top (and that is what I'm into right now) it's kind of ok. After all, I'm wearing that growing Aurora tank and I'm not pissed at it by the end of the day! I've been trying to find some fabric with both drape and heft. So I got these lovely swatches. The dark purple is Kaufman Washer Linen, a rayon-linen blend that is highly recommended by a blogger I read. The indigo is Kaufman Essex Linen, a cotton-linen blend. It doesn't have that much drape so I'm less crazy about it. The Aloe and the Beet fabrics are pure European linen. They also have less drape although I think more than the Essex. The striped fabric is a cotton-linen blend with tons of drape and a super soft hand. I looooove it and will make a tank out of it soon. I'm thinking about making a longish tank based on Megan Nielsen's Eucalypt tank and dress but hacked to provide more shape.
For the less drapey linens I'm going to try this salt water soak from Onawa Designs to see if I can't soften them up. I know she says it can fade colors but testing is what swatches are for!
Either way, I have made a rule that I'm not allowed to buy more fabric until I sew up my pattern assigned fabric stash... unless one of the fabrics I want is on major sale, or I go fabric shopping with my mom, or I visit Stitch Lab again. But I'm really going to try hard. Now that our room swap is done and I have my new sewing space put back together and more time (especially if it keeps raining and I can't work in the garden) I think the sewing will get done.
In the queue is:
- the adorable Forest Path Cape by Oliver + S for 2 of Small's friends out of the super-on-sale wool hounds tooth coating I got this fall.
- Colette's newest patter (Aster) which I got super excited about late one night and bought during the pre-sale. The moss colored shot cloth I keep switching project plans with is currently scheduled for that.
- Sewaholic's Hollyburn skirt which I'm going to make up in a crane printed quilting cotton I've had for a while.
- Aberdeen and Sydney are also in the cue, both made up in some fabric I already had but didn't know what to sew into.
- And there is going to be a quick and simple bag with a very old short piece of grey something or other and that half yard of orange print fabric I bought a a few months ago.
- Also I have the floral rayon linen for the Betsy skirt, a length of black spandex jersey with great recovery, probably for a wiggle skirt, and a few shorter lengths to mock up some woven tanks with until I find one I love.
- Car shirt and car shorts I promised Small (also Oliver + S patterns).
When I have sewn all that I am allowed to buy new fabric!
Oh, and I also need to make some black-out curtains for both bedrooms and some cafe curtains for one of them.
My wearable muslin is from a knit with a great pattern but horrible recovery so it grows as I wear it through the day. I decided for the next version I needed to lower the armholes a tad and take out some
of the width in the hem (like, 3 inches!). Also I want to reposition the shoulder straps so they are closer to my neck. I really prefer tank straps that way. I'll need to reshape the yoke in order to make that happen but I think I can hack it. That will be wearable (hopefully) muslin no. 2.
 I got a rayon silk jersey because I wanted to try it out. It's rather thin and slinky but it does feel lovely. I'm not sure that it will work as a t-shirt (on me) but maybe something drapey like a loose cardigan. I also got some cotton-poly open sweater knit. Not sure what I'll do with that either. Probably a cardi but maybe some kind of double layered skirt? For real warmth and layering I always wear wool cardis. They are cooler in warm weather and warmer in the cold (than cotton of the same weight) so they're great at transitioning between indoor and outdoor temperatures or as the temperature goes up during the day. However for those times when I need something to just basically cover my shoulders and upper arms (when a tank might not be appropriate or I want to dress something up) then I use the thin lacy sweater knits, etc.
One yard of a red striped pattern on dark blue. Not a pattern I'm usually into but it was way on sale and I'm willing to try new things.

A darkish green spandex cotton knit for a t-shirt. It's more army green than I wanted but it's ok.

White hearts on dark blue for a second Aurora. At this point I have 10 tanks or so, 2 of which are me-made and all but one of them are black or dark blue. I really have to switch it up. Of course now that I've found Aurora I'm going to make a million and ditch the ill fitting RTW tanks so new colors should be coming.

And heathered brown cotton blend jersey. It's not as soft as the heathered teal cotton blend I got last month but it's not too bad. It's mostly for muslins anyhow although if one turns out wearable this is certainly a color I would wear.

I also got some linen swatches.
I have this problem that, because I'm always reading about sewing, I am constantly getting new ideas and getting excited about new fabrics. I originally wrote linen off because it has a tendency to grow. That would be problematic for pants or a fitted dress but for a loose summer top (and that is what I'm into right now) it's kind of ok. After all, I'm wearing that growing Aurora tank and I'm not pissed at it by the end of the day! I've been trying to find some fabric with both drape and heft. So I got these lovely swatches. The dark purple is Kaufman Washer Linen, a rayon-linen blend that is highly recommended by a blogger I read. The indigo is Kaufman Essex Linen, a cotton-linen blend. It doesn't have that much drape so I'm less crazy about it. The Aloe and the Beet fabrics are pure European linen. They also have less drape although I think more than the Essex. The striped fabric is a cotton-linen blend with tons of drape and a super soft hand. I looooove it and will make a tank out of it soon. I'm thinking about making a longish tank based on Megan Nielsen's Eucalypt tank and dress but hacked to provide more shape.
For the less drapey linens I'm going to try this salt water soak from Onawa Designs to see if I can't soften them up. I know she says it can fade colors but testing is what swatches are for!
Either way, I have made a rule that I'm not allowed to buy more fabric until I sew up my pattern assigned fabric stash... unless one of the fabrics I want is on major sale, or I go fabric shopping with my mom, or I visit Stitch Lab again. But I'm really going to try hard. Now that our room swap is done and I have my new sewing space put back together and more time (especially if it keeps raining and I can't work in the garden) I think the sewing will get done.
 |
| linings for the capes |
- the adorable Forest Path Cape by Oliver + S for 2 of Small's friends out of the super-on-sale wool hounds tooth coating I got this fall.
- Colette's newest patter (Aster) which I got super excited about late one night and bought during the pre-sale. The moss colored shot cloth I keep switching project plans with is currently scheduled for that.
- Sewaholic's Hollyburn skirt which I'm going to make up in a crane printed quilting cotton I've had for a while.
- Aberdeen and Sydney are also in the cue, both made up in some fabric I already had but didn't know what to sew into.
- And there is going to be a quick and simple bag with a very old short piece of grey something or other and that half yard of orange print fabric I bought a a few months ago.
- Also I have the floral rayon linen for the Betsy skirt, a length of black spandex jersey with great recovery, probably for a wiggle skirt, and a few shorter lengths to mock up some woven tanks with until I find one I love.
 |
| fabric for Small's car shirt |
When I have sewn all that I am allowed to buy new fabric!
Oh, and I also need to make some black-out curtains for both bedrooms and some cafe curtains for one of them.
June 23, 2015
Sorbetto no. 2 - no pictures because it turned out to be a wadder :-(
I'm not sure it should really be called Sorbetto at this point. That is where I started but the only similarities between this blouse and Sorbetto is that they're both sleeveless. I even changed the shape and position of the shoulder straps so that's not quite the same either. This version is made from the Liberty Lawn masquerading as pink floral voile from Mood.
I drafted princess seams based on the darts I created in the last version. These were almost perfect right off the bat! I cut the neck into a more V shape and after examining the button placket of a RTW dress, drafted a placket for this number. I did the kind where it's stitched on the out side then folded under and stitched on the inside. Not sure how this is usually done but it works. Of course, not having read about best practices for buttons I didn't interface the placket. Oh well, next time. I also made the button holes horizontal which of course means they slide to the side. I was like "this is crazy!" and could not seem to come up with the obvious solution which is to sew them vertically. When I examined a RTW shirt vertical is the way they were sewn. Since then I've seen a few patterns where they're horizontal so I don't know what I'm "supposed" to do!
The back has a deep yoke with princess seams and then a split and overlapped lower back. After much fiddling I realized I needed to cut the lower back on the bias otherwise I was going to end up with more darts or seams. It's not quite perfect but I like it very much! I got tired of futzing with it. I could probably achieve a better fit by further tinkering with the angle and orientation of those panels but maybe that can happen next time. I also decided after wearing it that I didn't need the overlap. I'm not really concerned about showing my lower back and I think it would look better if it were just a slit. Next version.
The back panels have a weird curve at the bottom corners. I thought I was going to love that but not only was it very difficult to hem, I'm not crazy about how it looks. Oh well. Also, the hem is ridiculous. I used my narrow hem foot, which is a bad idea on curves to begin with and I'm bad with it on straight lines in any case so not sure what I was thinking! Next time I'm going to finish the hem with bias tape folded to the inside like I did with the neck and shoulder seams. I think that makes a very neat finish and one I can't mess up easily.
I have got to stop cutting apart my perfectly fitted muslins to pattern and instead rip the stitches. Twice now I've made a beautiful muslin and then thought to myself "that's a lot of seam to rip. I know, I'll just cut along the stitching lines and then add back the seam allowance!". This is not a good idea. Probably someone better than me can make this work but there is something about the way I do this that ends up with some pieces having slightly weird shapes which confuses me when I use that as my final pattern. So next time I vow to rip the stitches, trace the cutting lines and then make sure the seam allowances are correct from there!
In spite of all my criticism I really do like this blouse.
Weeks later: So, I wore this shirt all day and I'm not crazy about the fit. It mostly fine while standing although I think there is some issue with the fit in the shoulders because it feels like it hangs funny. Maybe I cut it off grain, not sure. Also, my waist measurement grows when I sit (some of yall know what I'm talking about) so the ease which is ample while standing is not comfy while sitting.
I've been looking into strategies for dealing with this so that I don't have a tent while standing. Inverted pleats, gathers, and shirring have been suggested. Kind of bummed that my lovely Liberty lawn ended up in a shirt I don't want to wear but that's the way it goes. That's why I haven't been buying expensive fabrics for all this educational sewing I'm doing. In fact there was a sale on knits and since I just made a successful wearable muslin of Aurora and needed more knit for other muslins... but more on that later.
I drafted princess seams based on the darts I created in the last version. These were almost perfect right off the bat! I cut the neck into a more V shape and after examining the button placket of a RTW dress, drafted a placket for this number. I did the kind where it's stitched on the out side then folded under and stitched on the inside. Not sure how this is usually done but it works. Of course, not having read about best practices for buttons I didn't interface the placket. Oh well, next time. I also made the button holes horizontal which of course means they slide to the side. I was like "this is crazy!" and could not seem to come up with the obvious solution which is to sew them vertically. When I examined a RTW shirt vertical is the way they were sewn. Since then I've seen a few patterns where they're horizontal so I don't know what I'm "supposed" to do!
The back has a deep yoke with princess seams and then a split and overlapped lower back. After much fiddling I realized I needed to cut the lower back on the bias otherwise I was going to end up with more darts or seams. It's not quite perfect but I like it very much! I got tired of futzing with it. I could probably achieve a better fit by further tinkering with the angle and orientation of those panels but maybe that can happen next time. I also decided after wearing it that I didn't need the overlap. I'm not really concerned about showing my lower back and I think it would look better if it were just a slit. Next version.
The back panels have a weird curve at the bottom corners. I thought I was going to love that but not only was it very difficult to hem, I'm not crazy about how it looks. Oh well. Also, the hem is ridiculous. I used my narrow hem foot, which is a bad idea on curves to begin with and I'm bad with it on straight lines in any case so not sure what I was thinking! Next time I'm going to finish the hem with bias tape folded to the inside like I did with the neck and shoulder seams. I think that makes a very neat finish and one I can't mess up easily.
I have got to stop cutting apart my perfectly fitted muslins to pattern and instead rip the stitches. Twice now I've made a beautiful muslin and then thought to myself "that's a lot of seam to rip. I know, I'll just cut along the stitching lines and then add back the seam allowance!". This is not a good idea. Probably someone better than me can make this work but there is something about the way I do this that ends up with some pieces having slightly weird shapes which confuses me when I use that as my final pattern. So next time I vow to rip the stitches, trace the cutting lines and then make sure the seam allowances are correct from there!
In spite of all my criticism I really do like this blouse.
Weeks later: So, I wore this shirt all day and I'm not crazy about the fit. It mostly fine while standing although I think there is some issue with the fit in the shoulders because it feels like it hangs funny. Maybe I cut it off grain, not sure. Also, my waist measurement grows when I sit (some of yall know what I'm talking about) so the ease which is ample while standing is not comfy while sitting.
I've been looking into strategies for dealing with this so that I don't have a tent while standing. Inverted pleats, gathers, and shirring have been suggested. Kind of bummed that my lovely Liberty lawn ended up in a shirt I don't want to wear but that's the way it goes. That's why I haven't been buying expensive fabrics for all this educational sewing I'm doing. In fact there was a sale on knits and since I just made a successful wearable muslin of Aurora and needed more knit for other muslins... but more on that later.
June 22, 2015
Garden Update and What to Make When Your Garden Produces Odds and Ends
 |
| Snails are all over the place, including our windows |
So. Much. Rain.
This summer's garden is not great and I can't even spend much time working in it because the soil has been waterlogged for months (and this is in large part why the garden isn't great). People around here often use raised beds, but then of course there are the yearly droughts and that's when raised beds have trouble. They dry out much, much faster than the surrounding soil. So, while we have some, it's important to remember they have their own quirks which will require more attention at some point in the year.
Nevertheless, the summer squashes are actually doing rather well! Usually the vine borers get them and, while they are there in the vines right now, I think the super wet soil is allowing the squashes to do a fantastic job of re-rooting along their length. Usually things are so dry that rooting on top of the soil (or just below the soil if you bury them to help them along) like that is very difficult them. Even with all the mulch we use on our beds it is very hard to keep the top half inch of soil at all moist when the rain doesn't fall and the sun shines brightly for weeks.
 |
| Dribs and drabs |
The green beans, which I planted 4 times, are finally doing ok. They'll crap out in another month, maybe more, and thus (if the soil ever dries enough) I need to do a second planting. The Violet's Multi Colored Butter Beans, which I had to plant 3 times (something was chomping all the beans this spring!) are doing amazing (except that I just noticed today something is nibbling the pods open)! They take a long time to ripen but those vines are huge and covered in pods. The purple podded pole beans are not as happy but they're ok. I think they are a little too shady on the north side of the trellis, in a shadier part of the garden, half under an Almond Verbena that is much, much larger than advertised.
 |
| an unusually large harvest, still small |
Eggplants, as so often happens, are just kind of hanging out. For the past few years they sit there all summer, growing super slow and throwing off the occasional fruit and then come fall, BOOM! Eggplant explosion.
Tomatillos are stressed by the wet soil. They are in our raised beds but even so you have issues when it rains like this because it washes the nutrients downward and they get pretty hungry. Honestly, the whole garden needs a foliar feed but I can't get out there to do it for all the rain and the swarms of mosquitoes (like, 20 per cubic foot of air) are off putting.
Okra was slow to grow but now it's getting going and I get a few pods a day.
I did manage to make one jam jar of pesto plus use basil regularly in cooking. The plants aren't awesome but I have enough of them out there to add up. My papalo (only one plant came up from seed) is growing well and I am so in love with it! Everyone who lives where it's too hot for cilantro in the summer, grow this herb!
So the garden is producing odds and ends but not much of any one thing. What do you cook when this happens? These are my go to meals:
Tacos - chop and roast the odds and ends and use in tacos with beans, cheese, and whatever else you usually like.
Pizza - chopped and roasted odds and ends can add up to a nice veggie pizza
Soup - the classic way to use up the odds and ends.
Fermented Pickles - I don't just put cucumbers in my fermenting jars, I also add green beans, okra*, and peppers. Everything can be fermented. These are just my favorites to ferment in this way.
Snacks in the garden - self explanatory.
Here are some pictures of my pickles in progress:
 |
Pickles and grape leaves |
|
| For the second jar I remembered to add the green beans and garlic |
 |
| I use a jam jar to weigh down the veg. Usually I drape a napkin over this and rubber band it under the lip of the larger jar. |
*I think I now know why I usually (always?) see okra pickled whole. I sliced them this time and the slime infected my entire jar. I mean, EVERYTHING is covered in mucus. I'll dump the brine, rinse the pickles, and rebrine them. Hopefully that helps because I hate to waste the jar but I can not deal with the goo.
May 24, 2015
Buttons
The other day I needed buttons for my project and went to my small button stash. I was able to find what I needed but the options were limited. I thought "wouldn't it be nice to have a good assortment on hand so I don't have to go to the store for buttons every time I want to finish something?"
I checked out eBay and found some nice vintage assortments, in great shape, on cards, for the right price! Here are some of my favorites:
There were tons of green (they took up an entire tin!) which is nice since that's my favorite color, lots of black and white, assorted other colors, and oddly, only 3 cards of blue.
I checked out eBay and found some nice vintage assortments, in great shape, on cards, for the right price! Here are some of my favorites:
 |
| These square guys, made in Italy. |
 |
| Fun green and white buttons, made in Holland. |
 |
| Love this color! |
 |
| Someone used this button card as scratch paper... |
 |
| These cost 100 cents rather than 1 dollar. |
 |
| Tea tins are a favorite storage method and lord knows I produce enough empty tins. |
 |
| Some of the loose buttons on the work table. |
There were tons of green (they took up an entire tin!) which is nice since that's my favorite color, lots of black and white, assorted other colors, and oddly, only 3 cards of blue.
May 23, 2015
On Buying and Using the Right Tools
I used to be very much a Jerry-rig/make do kind of woman. For some things I still am but I'm beginning to recognize the value of having the right tools for the job and using things that actually work when you need them to. I don't know if this is because parenthood has cut my free time to almost nothing or I'm just not as interested in spending time messing around with some tiny thing, on the way to a larger project, when I could just be doing the damn project.
We recently had to get a new stove because ours was nearly kaput. I mean, it was an improvement over a camp fire but it had become unreliable and half the functions didn't work (pepper season is imminent and I will have roasting of peppers to do!). I didn't realize how unreliable the old stove was until we got a new one and suddenly cooking was easier and faster. Dinner is taking half the time because the thing gets hot and it gets hot quickly. Amazing!
I feel this way about my tape dispenser too. For years I used whatever random, old (read: covered in dust and dog hair) roll I could find. It was annoying. Sometimes the thing broke and then it was a pain to tear the tape. Sometimes it lost its stick. And of course, dog hair and dust. After a few months of taping printed sewing patterns together and making fitting adjustments on pattern paper I decided to get crazy and buy one of those weighted tape dispensers that takes refills. Not only was this option cheaper and created less waste now that I tape all the dang time but it is so much easier to use! All my sewing related taping tasks go so much faster.

Here are some of the other good tools that have made things faster and less frustrating:

I'm not just crazy neat with my pins, that's the super strong magnet at work! I toss the pin in the general direction of this thing and SPOING!, it falls into line.

After reading a blog post all about seam grading I decided to splurge and get myself some 5" Gingher tailor's shears and it turned out not to be a splurge at all but rather the correct tool for the job. Lots of things were easier with these shorter scissors.
I feel this way about my iron too. After years of a leaky Rowenta (leaking almost since it was new... not too happy with Rowentas) I looked for recommendations from my favorite sewing bloggers and, after talking myself off the ledge of getting a gravity feed, went with the recommendation on Closet Case Files and got a not very expensive Panasonic. It is working WONDERFULLY and my sewing is much better because my pressing during construction is much better.
And of course there is the Raskog cart. That has made a WORLD of difference. It used to be that I had to wander all over the place to put things away after a sewing project. Containers for all my tools were in different places. Since this was a pain it tended not to get done things were a mess. Now, I just roll my cart over and put everything right back where it goes. Love it.
See? Right tool, right job - magic.
We recently had to get a new stove because ours was nearly kaput. I mean, it was an improvement over a camp fire but it had become unreliable and half the functions didn't work (pepper season is imminent and I will have roasting of peppers to do!). I didn't realize how unreliable the old stove was until we got a new one and suddenly cooking was easier and faster. Dinner is taking half the time because the thing gets hot and it gets hot quickly. Amazing!
I feel this way about my tape dispenser too. For years I used whatever random, old (read: covered in dust and dog hair) roll I could find. It was annoying. Sometimes the thing broke and then it was a pain to tear the tape. Sometimes it lost its stick. And of course, dog hair and dust. After a few months of taping printed sewing patterns together and making fitting adjustments on pattern paper I decided to get crazy and buy one of those weighted tape dispensers that takes refills. Not only was this option cheaper and created less waste now that I tape all the dang time but it is so much easier to use! All my sewing related taping tasks go so much faster.

Here are some of the other good tools that have made things faster and less frustrating:

I'm not just crazy neat with my pins, that's the super strong magnet at work! I toss the pin in the general direction of this thing and SPOING!, it falls into line.

After reading a blog post all about seam grading I decided to splurge and get myself some 5" Gingher tailor's shears and it turned out not to be a splurge at all but rather the correct tool for the job. Lots of things were easier with these shorter scissors.
I feel this way about my iron too. After years of a leaky Rowenta (leaking almost since it was new... not too happy with Rowentas) I looked for recommendations from my favorite sewing bloggers and, after talking myself off the ledge of getting a gravity feed, went with the recommendation on Closet Case Files and got a not very expensive Panasonic. It is working WONDERFULLY and my sewing is much better because my pressing during construction is much better.
And of course there is the Raskog cart. That has made a WORLD of difference. It used to be that I had to wander all over the place to put things away after a sewing project. Containers for all my tools were in different places. Since this was a pain it tended not to get done things were a mess. Now, I just roll my cart over and put everything right back where it goes. Love it.
See? Right tool, right job - magic.
Subscribe to:
Posts (Atom)